
My Hands
Mine are the hands of your best friend, filled with love for you.
Mine are the hands that will be holding yours on our wedding day, when we promise to love each other today, tomorrow and forever.
Mine are the hands that will always be there to lend you strength and comfort when you need it.
Mine are the hands that, even when wrinkled and aged, will still be reaching for yours, offering undiminished tenderness with their touch.
These are my hands, and yours.
Vintage Camera Restoration - Welta Perle
The easiest way I can think of to explain how to restore a vintage camera is to restore one, photographing each step in the restoration process. To that end, I went on eBay and bought a Welta Perle that was in pretty bad shape, but that didn't look like it would be hopeless. Here are a few of the "before" photos, detailing the damage:

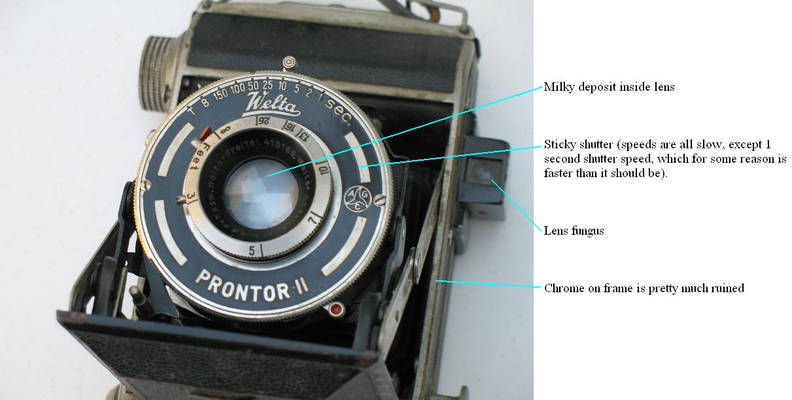


Okay, now that I have a fairly good idea what is wrong with it, I can start making repairs. It will be a beautiful and fully functioning camera when I am done.
First, I am going to clean the glass (lenses and viewfinder). To do this, I am going to use distilled water (to remove general crud), a 50/50 mix of ammonia and hydrogen peroxide (to kill and remove fungus), and naphtha (lighter fluid) to remove grease and oil. I'll apply each solvent, in turn, with cotton swabs and remove it with them too. I'll put t on with a wet end and then mop it up with the dry end. I'll twist each swab slowly, so it lifts dirt away from the glass instead of rubbing it against it. So let's get started.

First I use a Sharpie marker to make a small mark on the focusing ring and one under that mark on the front of the shutter, so I can get it back together again with the lens in the correct position. The ink in Sharpie markers if soluble in alcohol, so I am not making permanent marks. Then I use a precision screwdriver to remove the set screws that hold the front lens element in place. I take that off by unscrewing the front lens ring, counting the rotations and making a note of it. This exposes the front and back of the front lens element and the front of the center lens element. I clean that, with all three solvents and then again with the distilled water. I am going to go through a lot of cotton swabs. Don't be stingy with them. I can clean the back of the rear element too, while I am at it. Now look at the viewfinder. There are two small screws on each side of it. I can remove those and it lifts off. I clean those too and then put it back on.

See that odd-looking black tool in the photos? That is called a lens wrench or lens spanner. I am going to use that next. I turn the camera over and open the back of it (like I was going to put film in it). You'll see the back of the bellows and in the middle of it is the rear lens element. It is surrounded by a black ring. In the edges of the ring are two notches. I adjust the wrench so that it fits those notches and use the wrench to unscrew it. I clean the rear lens element with all three solvents and then again with distilled water. Now, where the rear lens element was, I can see the back of the aperture blades and, if I open them wide, I can see the backs of the shutter blades. I set my shutter on B and trip the shutter. Now I can see the back of the center lens element and I clean that. Don't put the lenses back on yet, because now we are going to clean the shutter.

In this photo, you will see that I have removed the front of the shutter, along with the center lens element (it has a ring with slots, just like the rear lens element does). This exposes the guts of the shutter. If you know how to disassemble it and reassemble it afterward, by all means do so and clean ever little bit of it. If not, then just do a flush clean. It will work fine. To do a flush clean, flood the shutter with lighter fluid and drain it, three times. Then, while it is still wet, take that small artist's brush and work it around inside everything that you can reach, then work the shutter a few times and flood and drain it again. If it is still misbehaving, try doing it again with oil. Then flood it with lighter fluid again and drain it a few more times, to get rid of the oil Every time you flood it, you work the shutter a few times, to work the solvents deep inside it, dissolving every trace of old dried up oil and crud. When you drain it, all of that runs out. Finally, you finish by lightly lubricating all of the pivoting point and places where parts rob against each other. Go VERY light with the oil. Oil does not stay where you put it and your shutter got sticky in the first place because oil migrated into places that it shouldn't go and then it dried out. Use only as much oil as you can lift with the point of a pin. Put everything back together, but leave the lenses off. Now you are going to clean the shutter blades. You get them wet with naphtha (lighter fluid) and work them a few times. Then mop up the lighter fluid with the dry end of a cotton swab. Keep doing this until you don't see any more oil film on the blades (it will be iridescent, grey or brown). Once that is done, turn the camera over and do the same thing to the backs of the blades. Do this to the shutter blades and the aperture blades. Okay, you have done a simple shutter flush and cleaned the blades. Let it dry out and put the lenses back in. Be sure to line up the marks that you made with the sharpie pen when you reinstall the focusing ring. Then you take some rubbing alcohol and a cotton swab and remove the marks.
Now to do something about that paint and leather.

First, I remove all of the leather. I just peel it off as best I can, and then I take an X-acto knife and scrape the rest off. I don't have the equipment it would take to chrome the camera, so I am going to take all the chrome off and paint it (paint won't stick to chrome). I take some medium grit sandpaper and sand it all off, then I go to 400 grit paper and go over it again. This will smooth the surface enough that no scratches will show through the paint and still leave enough "tooth" (roughness) that the paint will stick well. I have a rotary tool for grinding through any especially stubborn chrome. I finish with a wire brush, in the rotary tool, to remove any remaining flakes and grit.

Okay, you have the surfaces that you want to paint down to bare metal and it has a tooth, so the paint will stick. Next, you tape it up, so that nothing that you don't want painted black is covered. I have also removed that awful black strap that was dried and cracked and held on with a bolt and washer. I gave it a very light coat of primer and then I took some automotive grade enamel (Mazda black), thinned it to 50 percent and put it into the bottle of my air brush. Then I started painting. The brushes are for parts I can't get to with the air brush. I paint one side, let it dry for two days, then turn it over and paint the other side. I let that dry for two days and then I remove the tape. Here's something about enamel: it is soft. You have to harden it. The easiest way to do that is to wait for a hot day and just set it out in the sun. Leave it alone for two days so that the paint can cure and harden. If it isn't hot enough for you to do that, get a box and put a coupe of 100-watt lightbulbs inside of it with your painted camera body. It will get hot enough to cure your paint. Alternatively, you can use epoxy appliance paint from the hardware store, It will take a week to dry and cure, and you'll have to do your spraying from a can, but you won't have to heat it.
Now about that leather:

I used a piece of black pebbled kidskin, mostly because I already had it. If you don't, there is a company called Cameraleather (cameraleather.com) that sells sheets of pebbled black goat skin that is self sticking, with white backing paper that you can write on. I just stuck some masking tape on mine (black ink doesn't show up on black leather particularly well). I measured the areas that were going to need leather very carefully and laid out lines on the tape where I would need to cut. Although goat skin wil stretch a little if you need to, it is better to be precise. I've even marked which side of the lines to cut on. I cut the leather to fit and glue it down with contact cement. I have even replaced the strap, and I used rivets, like what was supposed to be on there.

I did some research and found out that a couple of the buttons on this camera were originally red, so I used a very hard nail polish to paint them red. I also dyed the back of that leather strap red to compliment them. I have already done so much to the camera that it isn't going to hurt the value. By the way, if you have a rare collector's camera that is in good condition, don't do this to it. Just clean it and lube it. Otherwise you will have just killed its collector value. Before I restored this one, it was just one step away from becoming landfill. With that in mind, I also inset a disk of leather into the face of the winding knob. I know that isn't original, but at this point, who cares? I am going to do a little touchup work to the paint and fix that broken film cradle now.

Whoever had this before me decided it would be a great idea to remove the film cradle. It was not a good idea. It taking it out, he broke both of the studs off that held it in place. He also dented it. I cut a piece of dowel, rounded the end and used that as a punch to tap the dent out. I sanded all of the paint off and used JB Weld (a kind of cold weld epoxy) to install new pins made of cut down brads (small steel nails). Then I painted the whole thing. The hardest part of this whole job was getting this film cradle back in without breaking my new pins. I finally managed it though. While I was at it, I took a scrub pad (Scotchbrite) and scrubbed that corrosion from the backplate (the metal part surrounding the film frame opening).

Here it is with the film cradle installed. I am pretty much done. Now for a final "camera porn" photo.
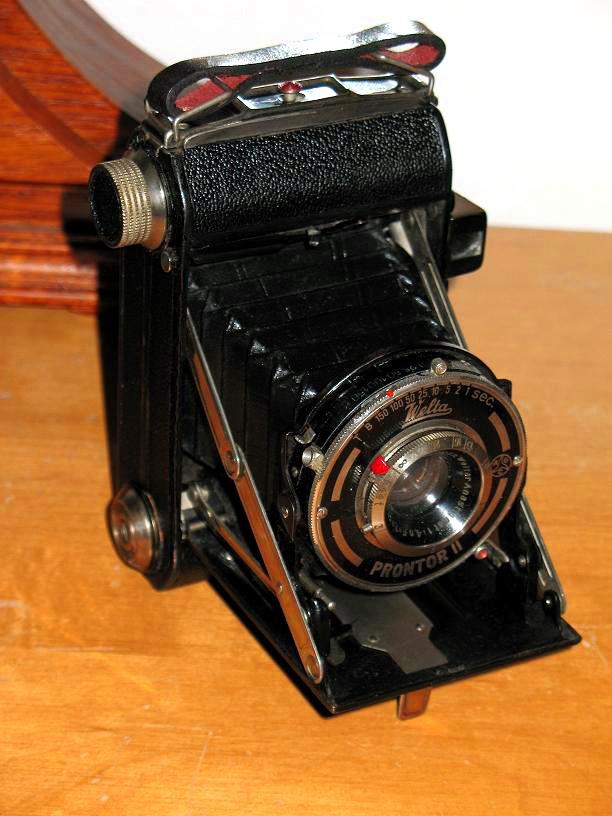
A final clean and polish and It's done!

We were talking and we were happy. Then she heard her dog making weird noises. He was staggering around and fell down. She went to check on him. He started bleeding from every orfice. Someone had poisoned him with rat poison (warfarin, which causes massive internal bleeding). His insides pretty much liquified. He was in great pain and must have been like that for some time before she found him. He died quickly after that, with my wife petting him. It takes a very special kind of asshole to do that to a dog.
There is a film called T-Max 100 and it is incredibly sensitive to agitation and temperature during development, as well as to the choice of developing agents. If you develop it in T-Max developer, in cold water, with very gentle agitation, it will give you slick, smooth, almost grainless images. Develop it in D-76, in warm water and shake it hard though, and you get grain from hell. This does NOT mean that you should always use T-Max in cold water and baby it. What this means is that you have another tool that you can use when deciding what kind of image you want to make. You can make its sensitivity work for you. If you like surrealism, for example, you can boost the contrast and really shake it and you will get an image that almost looks like a pointillist painting or drawing (pointillism is what happens when you get a fine point pen and do a drawing made up of tiny dots). This is an example:
Here's another:

With less contrast, you get something like this:

The trick is to find something that you think would look good as a surrealistic painting or drawing. For me, I like the effect most on landscapes and nudes. If you have a film camera and would like to do something like this, now you know how.
Vignetting: dark or light edges? Why?
Vignetting was something that was popular in the 1800s, especially for landscapes. The edges of a photo were either dodged white or burned black. Burning means that you block the light from hitting the photosensitive paper with a piece of paper under the enlarger (a thing that projects the image onto that aforementioned sheet of photosensitive paper) with a big hole in the middle ("burning" only the middle part of the photo in while leaving the edges unexposed). If you do that, then the edges of the paper will be white. you keep the paper with the hole moving, so the edges are feathered (blended) in. This is called vignetting. Dodging means that you instead use something to block the light from hitting the middle of the image (that has already been exposed to the image). The edges turn black and this is called reverse vignetting. Through common usage, both terms have come to be called vignetting. Photoshop and most other editing programs, have burning and dodging tools, if you are not using a darkroom. "Burning" darkens certain areas and "dodging" lightens them and you can go all the way to white or black. With vignetting, this is applied to the edges of the photo, making them black or white.
Vignetting has several purposes. It can isolate the photo from a non-complimentary background. It can provide contrast with a black or white mat. Most importantly, it draws the viewer's attention into the middle of the photo, where you want it to go. I confess that I LOVE reverse vignetting (dark edges) for classic head-and-shoulders portraits. It seems to draw more attention to the person's face.
You can do it heavily and it adds an air of mystery to a portrait, like the person is emerging from the shadows.

Or you can do it lightly, just a narrow edge that is slightly darkened, to simply highlight the portrait.

Both are very effective and add a little bit of visual impact to your subject.